
Tutorial: Spun Sugar Nails
Saturday, February 09, 2013
Hey! You've spoken and I've answered! Here is a combination blog and VIDEO tutorial to help you achieve the spun sugar look on your nails.
I've noticed that some of the spun sugar manis I've seen don't really represent spun sugar. The strings of polish should be thin and look like real spun sugar.
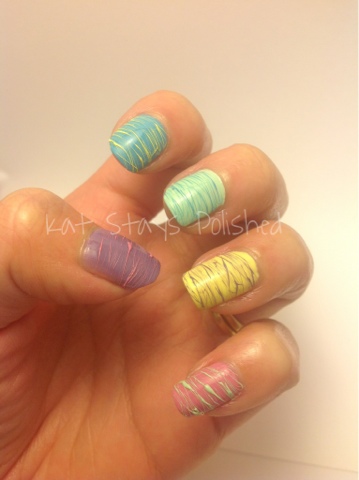
For this tutorial, I'll be using pastel colors.
Paint each nail in the colors below or something similar:
- OPI Sparrow me the Drama
- Julep Blake
- China Glaze Re-Fresh Mint
- Julep Claire
- OPI Planks a Lot
Top it off with one coat of Seche Vite. You don't have to do this step, but I wanted to be able to work on a shiny surface.

Work on only one finger at a time. Dab a few blobs of your desired color or colors onto a palette or the back of a stamping plate. I'll be using Re-Fresh Mint over Sparrow Me the Drama.
I used a dotting tool to do this technique. Some people use a toothpick, but I think that might be one of the reasons this doesn't work for some people. Personally, I've never used the toothpick method for this and the dotting tool works just fine.

Mix the polish with your dotting tool and blow on it to dry it out. You want it to become stringy. When your polish looks like the picture below, you're ready to begin!

For easier cleanup after you're done, brush some cuticle oil around the nail you're working on.

For further explanation, please see my video.
When you're done, use your cleanup brush or a cotton swab dipped in polish remover to get rid of the excess polish on the sides of your nails.
Below is the final look on all five fingers!
 |
| Spun Sugar Nails |
 |
| Spun Sugar Nails |
 |
| Spun Sugar Nails |
Thanks for stopping by and I hope you learned something new! Check out my video for a complete step by step tutorial!


6 comments
Never tried this, but your step by step was really helpful! (:
ReplyDeleteI'm glad you liked it! Please share your design with me if you do it! =)
DeleteCool, Thanks for the video :D
ReplyDeleteHey, wonderful nail art and thanks for the easy tutorail. They look very pretty :)
ReplyDeleteYay just the tutorial I'm looking for today, thanks Kat! :-)
ReplyDeleteHehe, awesome!! This was my very first, but I have other spun sugar tutorials. Maybe 1 or 2 more, haha.
Delete