


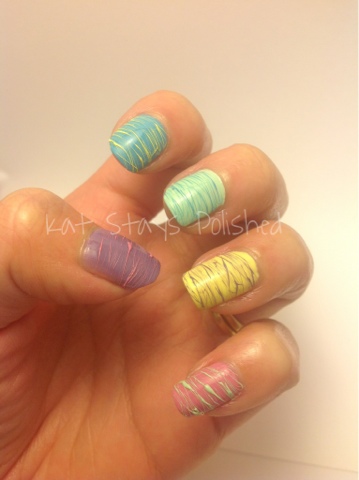
Can you believe that Easter is only a couple of weeks away?! Why not create a cute Easter egg hunt on your nails to get in the spirit!
Along with these pictures is, of course, a video tutorial at the bottom. Be sure to check it out!
 |
| Spun Sugar Easter Egg Hunt Nails |
 |
| Spun Sugar Easter Egg Hunt Nails |
 |
| Spun Sugar Easter Egg Hunt Nails |
 |
| Spun Sugar Easter Egg Hunt Nails |
 |
| Spun Sugar Easter Egg Hunt Nails |
 |
| Spun Sugar Easter Egg Hunt Nails |
Video Tutorial:
You've got 2 more weeks until St. Patrick's Day! Do you know what you're going to put on your nails?
This one is such a cute little design that incorporates the spun sugar method!
At the end of every rainbow is....a POT OF GOLD! You can learn how to do this awesome look through the video tutorial at the end of this post.
Enjoy the pics and let me know what you think!
 |
| Pot of Gold Spun Sugar Rainbow |
 |
| Pot of Gold Spun Sugar Rainbow |
 |
| Pot of Gold Spun Sugar Rainbow |
 |
| Pot of Gold Spun Sugar Rainbow |
VIDEO TUTORIAL
Okay, so, if you haven't seen my original spun sugar mani tutorial, what are you waiting for?! It will help you perfect your technique so that you can do the same with holographic polishes.
If you're familiar with holographic polish, you know that it has a different consistency than regular polish. Some holographics have a gloppy consistency and that can make it difficult to use for spun sugar nails.
The pictures below will show you what you need to look for when drying out your polish to use for the spun sugar.
Holos used:
These two images are at the midpoint stage to where you can begin "spinning." The thread does not stretch high enough so you won't necessarily get the long, thin strands you need for this look.

Here you are ready to go. Even though the image on the left shows it a bit thick, when you stretch it higher, it gets thinner. You'll have to work rather quickly because strands can begin to break.


If you're familiar with holographic polish, you know that it has a different consistency than regular polish. Some holographics have a gloppy consistency and that can make it difficult to use for spun sugar nails.
The pictures below will show you what you need to look for when drying out your polish to use for the spun sugar.
Holos used:
- Color Club Halo Hues Kismet (pinky)
- Color Club Halo Hues Eternal Beauty (ring)
- Color Club Halo Hues Miss Bliss (middle)
- Color Club Halo Hues Over the Moon (pointer)
- Color Club Halo Hues Harp On It (thumb)
These two images are at the midpoint stage to where you can begin "spinning." The thread does not stretch high enough so you won't necessarily get the long, thin strands you need for this look.
Here you are ready to go. Even though the image on the left shows it a bit thick, when you stretch it higher, it gets thinner. You'll have to work rather quickly because strands can begin to break.
With practice, I'm sure you'll be able to achieve this look with any polish you desire.
Thanks for stopping by! Good luck with your tries! Be sure to post them to my Facebook! I'd love to see them!
For quick reference, here is my original tutorial.
Hey! You've spoken and I've answered! Here is a combination blog and VIDEO tutorial to help you achieve the spun sugar look on your nails.
I've noticed that some of the spun sugar manis I've seen don't really represent spun sugar. The strings of polish should be thin and look like real spun sugar.
For this tutorial, I'll be using pastel colors.
Paint each nail in the colors below or something similar:
Top it off with one coat of Seche Vite. You don't have to do this step, but I wanted to be able to work on a shiny surface.

Work on only one finger at a time. Dab a few blobs of your desired color or colors onto a palette or the back of a stamping plate. I'll be using Re-Fresh Mint over Sparrow Me the Drama.
I used a dotting tool to do this technique. Some people use a toothpick, but I think that might be one of the reasons this doesn't work for some people. Personally, I've never used the toothpick method for this and the dotting tool works just fine.

Mix the polish with your dotting tool and blow on it to dry it out. You want it to become stringy. When your polish looks like the picture below, you're ready to begin!


For the next steps, you'll want to pull up your dotting tool to stretch out the polish into a thin strand. Gently lay each strand over your nail. If you happen to get a long enough strand, you can bring the leftovers back over the nail in the opposite direction.
For further explanation, please see my video.
When you're done, use your cleanup brush or a cotton swab dipped in polish remover to get rid of the excess polish on the sides of your nails.
Below is the final look on all five fingers!
I've noticed that some of the spun sugar manis I've seen don't really represent spun sugar. The strings of polish should be thin and look like real spun sugar.
For this tutorial, I'll be using pastel colors.
Paint each nail in the colors below or something similar:
- OPI Sparrow me the Drama
- Julep Blake
- China Glaze Re-Fresh Mint
- Julep Claire
- OPI Planks a Lot
Top it off with one coat of Seche Vite. You don't have to do this step, but I wanted to be able to work on a shiny surface.
Work on only one finger at a time. Dab a few blobs of your desired color or colors onto a palette or the back of a stamping plate. I'll be using Re-Fresh Mint over Sparrow Me the Drama.
I used a dotting tool to do this technique. Some people use a toothpick, but I think that might be one of the reasons this doesn't work for some people. Personally, I've never used the toothpick method for this and the dotting tool works just fine.
Mix the polish with your dotting tool and blow on it to dry it out. You want it to become stringy. When your polish looks like the picture below, you're ready to begin!
For easier cleanup after you're done, brush some cuticle oil around the nail you're working on.
For further explanation, please see my video.
When you're done, use your cleanup brush or a cotton swab dipped in polish remover to get rid of the excess polish on the sides of your nails.
Below is the final look on all five fingers!
 |
| Spun Sugar Nails |
 |
| Spun Sugar Nails |
 |
| Spun Sugar Nails |
Thanks for stopping by and I hope you learned something new! Check out my video for a complete step by step tutorial!


